Monday, December 28, 2015

Amazing {Chattering Robin's DT mixed media layout}


Hi everyone!  Kathleen here with my final project as a Chattering Robin's designer.

I would like to thank The Robin's Nest for allowing me to design with their wonderful paper collections and embellishments.  I was a huge fan of their products long before I became a designer for them.  Their dew drops are one of a kind and so very fun to use in multiple ways.  It has been so much fun and a privilege creating projects for you Robin's Nest fans out there.

Today I would like to share a layout I created featuring my favorite Shimmer Diamond Dew Drops.  As we head into yet another New Year I wanted to look back at all the fun times I had like this trip to Paris.

What an "Amazing" adventure!


I started with this fabulous Star Border Glitter Cardstock and cut it in half then glued the top to the bottom with the stars now in the center of the page.  Using two different stencils and modeling paste I created a faux city scape background.


I layered several cut outs from the Wedding Cut-Outs Cardstock behind the picture.


Using True Blue stickles I traced the outline of the word chipboard.  The gorgeous Eiffel Tower by Gina's Designs was embossed with Lindy's Stamp Gang Silver Moon Turquoise embossing powder.

Dabbing my paint brush in water then again in gesso I lightly paint around the cut-outs and along the center.  After that dries I come back and lightly use Lindy's Stamp Gang Hydrangea Blue followed by Ponderosa Pines Olive.

Finally I scatter the Shimmer Diamond Dew Drops, opaque on top and clear on bottom.  The final touch is lightly going over the bits of the layout with BoBunny Silver glitter paste.


I hope what you have seen here today ignites your own creativity to take flight!


Happy New Years!!!


Robin's Nest products


Star Border Glitter Cardstock 
Shimmer Diamond Dew Drops 

Wednesday, December 23, 2015

Making mini gift boxes for the holiday with Helmar Glue.


Gift boxes for those small gift items or treats featuring Helmar Quick Dry Adhesive!

Merry Christmas greetings to you!  Kathleen here with a quick and easy way to create your own festive gift/treat boxes.


Step one: Create your template by cutting out two 6" circles from ordinary cardstock paper.
Fold the circle in half  then again in half forming and X.
With a marker take one of the circles and match up the rounded outer portion from one line to the other as shown below. Do this to both circles.


Place one corner portion of the circle on top of the other circle then glue them together using your Helmar Quick Drying Glue as shown below.

Now that we have our template it is time to trace and cut  from any decorative paper you wish to use to create your gift box.  Repeat the markings that are on the template to the backside of your box.

Step 2: Using a soft edge tool(knitting needles would work beautifully for this) score the lines and begin to fold each semi circle.  Glue two sides together leaving the top open.


Step three:  Using a circle punch center your opening fold half way and punch.  Repeat this on the second opening fold.  

This is a perfect time to rummage through your stash for any decorative elements to adorn your boxes.
I hope what you have seen here today has inspired you to let your own creativity take flight.


Merry Christmas


 450 Quick Dry Adhesive 1.7 fl.oz.

Wednesday, December 16, 2015

C'est Magnifique New Beginnings kits


C'est Magnifique New Beginnings kits

Here we are at the middle of the month again and that means we're excited to give you a look at the paper we will be using in our January Kit, the Magnifique Mixed Media Kit and our two add-ons.
The patterned paper for January:
Blue Fern Studios -USA

Blue Fern Studio Autumn Anthology Collection
The January Magnifique Mixed Media Kit is available now in our Store!
Prima Canvas Album
Prima flowers Eminence
Prima Clear Stamp
Embroidered Canvas
Stick Pins
Blue Fern Studio Celebration Hearts *
Blue Fern Studio Embossing Powder
WeRMemory Keepers Flowers Stems Kit
Canvas Sheet
C'est Magnifique Blue Bubbles Paint
C'est Magnifique Bubbles Shimmer Mist
C'est Magnifique Mango Milk Paste
C'est Magnifique Blueberry Rasberry Sparkles
C'est Magnifique Pinkcicle Paste
*Partial Package
Flower Add-On

We create a Flower Add-On each month for those of you who like extra flowers. We have selected flowers that compliment the kit and put them together as an add-on.
Prima:Aire Collection, Calcutta, Divine, Elle, Mini Bouquet, Lucerne
Lastly, we have an Embellishment Add-On so you can stretch your kit even further.

Goodie Bag Includes: Buttons, Kaisercraft pink brads, Cork Circle,
BakersTwine, Mni Assorted Tile Words, C'est Magnifique Blue/Brown Silk
Prima Canvas Banner
Prima Metal
Prima Lovely Prints
Blue Fern Ginger Poppies
Petaloo BurlapBlossoms*
*Partial Package
Doesn't the January Kit look gorgeous?
The Magnifique Mixed Media Kit, the Flower Add-On and the Embellishment Add-On are available now for purchase in the C'est Magnifique Store!

Tuesday, December 15, 2015

Times a wasting


To Scrap Around the World I bid you adieu.

You were a source of grand inspiration and fun.  You will be deeply missed.


 I was inspired by the fuchsia and gold colors, the floral arrangement and the bling!  Gorgeous moodboard.


Thank you for stopping by for a peek. 


Monday, December 14, 2015

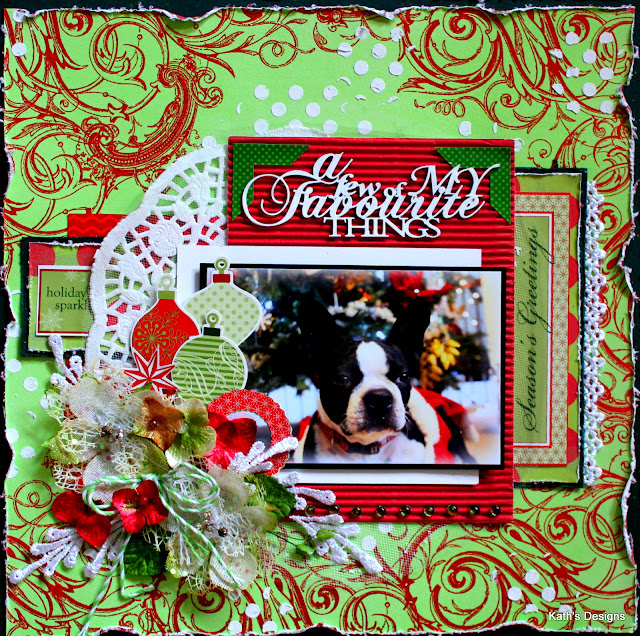
A Few of my Favorite Things (luscious layors) Robin's Nest DT


Kathleen here sharing a luscious layered layout featuring Robin's Nest Cindy Lou Cardstock.  I took this picture of my precious Eloise a few years back.  Doesn't she look lovely in her Christmas frock!


A Few of My Favorite Things


The base of this layout starts with Hunter Green with Green Glitter Cardstock cutting out an 8"x8" section from the center of the paper.  Distress the edges.  Cut 1/2" off the top and side of  Cindy Lou Swirl Glitter Cardstock and distress the edges.  Stick these two papers on top of each other.

For a tad bit of interest I used a dot stencil and modeling paste around the page.

Now to build our layers!


Don't forget to save those scraps from earlier projects.  They are perfect for layering.
I love flowers and a Christmas layout just isn't complete without them.


I hope what you have seen here today has inspired you let your own creativity take flight.

Wishing you and yours a very 

Merry Christmas


The Robin's Nest products

Olive Mini Dew Drops

Berry71bleu  moodboard  
I was inspired by the green and reds and the flourishes plus the tile stack look.

tic tac toe challenge
trinkets, winter theme, corrugated paper

Monday, December 7, 2015

December 7, 2015


Christmas Preview


Holiday greetings everyone!  Kathleen here to share a Christmas inspired layout with you.

Going through old photo albums I found this picture of my son as a toddler experiencing his first memorable Christmas experience.  Just look at all of that red hair!  lol  Today he shaves his head because he has so little hair.  Hard to believe isn't it!
I was aiming toward a vintage feel to enhance the this old picture.


For this layout I selected the stunning 7 Dots Studio Warm Cider paper from the Yuletide collection.  Since I couldn't decide which side I loved more I used both! I cut a 5"by 12" piece of the stripe side and adhere it to the 12' by 12" piece.


With a simple dot stencil I created a flourish from the top left corner down to the lower right corner with modeling paste.  I did a bit of stamping with first a small snow flake then numbers stamps.  Then with watered down gesso I white washed a bit of the striped side to soften the lower half giving it a feel of snow falling.


The holly chipboard was given two coats of gesso then lightly edged with chocolate Brownie Coloringz and added red micro bead for the berries. 7 Dots Studio - Soul Mates-chipboard  piece was painted in gold and adhered to the postcard that frames the picture. The heart chipboard given one coat of gesso then topped with BoBunny's silver glitter paste. I came back later and lightly applied the glitter paste to the dots causing them to glitter and sparkle in the light.

With a series of  7 Dots Studio - Yuletide 12x12 tags and a couple of cutouts I created a frame work for the picture.  
Tip: Save items that you find on packaging like this white tassel that came with a set of sheets I bought.

Now it's time to add a few flowers, cheese clothe, ribbon and bling!


Thank you for stopping by and taking a peek.  I hope what you have seen here today has inspired you to let your own creativity take flight!


Have a very Merry Christmas


Store items

7 Dots Studio - Yuletide elements 6x12
7 Dots Studio - Yuletide collection kit
7 Dots Studio - Yuletide 12x12 tags
7 Dots Studio - Soul Mates-chipboard 


7 Dots Studio - Vintage 


Scrap Africa sketch challenge


Berry 71 bleu moodboard 
I was inspired by the Moroccan tile and deep red and black colors.