Monday, October 27, 2014

October 27, 2014

                   In the Moment {Creative Embellishments}


My daughter is working hard on her Physician's Assistant degree that moments shared with her hubby are few and far between.  So when they were visiting here I couldn't pass up the opportunity to do a photo shoot of them with their new puppy.  For this page I used papers from MME Cut & Paste by Jen Allyson collection.


For the focal point of this layout I used this incredible Antique Clock  and Pipe Works chipboard from Creative Embellishment.  I also fussy cut some  flowers and used some brads and chipboard from this  MME collection and added a few flowers from my stash.

I began my design by spritzing some Tatter Angels Valencia, then applied some texture paste with a flourish stencil.  Then I used a couple of different butterfly stamps here and there and finished up by painting on some Jenny B Bleus Vibes paint by Shimmerz.

Thank you for stopping by and I hope you visit me over at Creative Embellishments blog.

Creative Embellishments , Antique clock, Pipe Works

 Scrap Around the World moodboard.
 I was inspired by the romantic feel of the board this month.


C'est Magnifique

Berry71bleu

Sunday, October 19, 2014

October 19, 2014

                                         Dreams of Fall

To me there is nothing like cool crisp mornings walking my four legged babies in the woods in search of squirrels.  This is made even more fun with the leaves falling to the forest floor making the squirrels readily visible.  But I also enjoy photographing my daughters on our walks. 


This layout is a true mis masch of some of my favorite paper collections.

Graphic 45;  Bird Song, French Country, Steampunk Spells  Fanciful Floral, Vintage Voyage  Plus  tags and chipboard pieces.
Maja Vintage Frost Basics

Embellishments
Creative Embellishments flourish  and large gear chipboards pieces.
Spare Parts frame

 Scrap Africa  The list is on the tag with with the sunflower by the picture.  It pulls out.


 Scrap 365   
I really enjoyed this month's sketch.  It has so many possibilities from square frames to circles and tags.  I hope you enjoy my interpretation.
 

Berry71bleu  Mood board  I was drawn to the colors the leaves flowing down and the waves in the hair.

A layout with new "October Nesting Components kit" PWP

A layout with new "October Nesting Components kit" {Paper Wings Productions}

 A wonderful fall greetings to all!  Kathleen White here  from Talking Papers with a layout to share with you today. 
Earlier this week I received this kit in the mail from Paper Wings Productions.  I felt like a kid in a candy store as I opened it and so many fun items poured out!  These kits always include the most gorgeous clip art sheets.  When I saw the picture of the  little girl holding a jack-o-lantern I knew I had to create a layout around her!

I just love all the elements in the kit that mix so well with other papers I have.  There are spiders, bats, pumpkins etc in the Halloween confetti,  Plus four 6x6 sheets of pattern paper which I used in this project.

.I used the Skeleton stencil for added texture on the torn paper behind the frame.  It's so versatile.  You don't have to use the entire thing.
 I made a couple of embellishment clusters using the ribbon, confetti and tags.
Thank you for stopping by today and hope you enjoyed my project.  You can take a closer look at the kit here


Artastic  Use a vintage style photograph

Frosted Designs  Fall colors, ink and bling

Friday, October 17, 2014

Halloween card for Paper Wings Production DT

Halloween card for Paper Wings Productions Design Team


Kathleen here and I can't wait to share these Halloween cards that I design from this month's Nesting components kit.


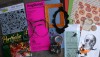
First up is this fall leaves card sprinkled with unexpected delights! I used the items below to create
this card.


For this sweet darling of a card I used the black card form found in the kit.
Next I used a decorative punch on the end of the jack-o-lantern paper and tucked a gold doily behind it.  Finally I cut out of of the fun clip art photos topped it with some dots a cute chipboard trick or treat bag and some flowers. 


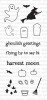
One of my favorite elements from this kit is the totally cool 6x6  skeleton stencil.


  Here is how I made this card.

1. Using an artists palette knife spread a thin layer  DecoArt Dimensional effects texture paste over the skeleton stencil on a piece of black card stock and let dry.  Once dry cut out the skeleton mask.

2.  I selected the orange card provided in the kit and put a stripe of washi tape (also included in the kit) along the top and bottom of the card extending it to the back side.

3.  Put pop dots on the back of the skeleton mask and adhere it to the center of the card.  Glue the boo cut out to side and viola!

I also used the washi tape on the inside of the card.

Thank you for joining me here today and let your creativity take flight!

Items used for the above project can be found in this kit.


Halloween Hodgepodge Mixed Media Kit
The Halloween Hodge Podge Nesting Components Mixed Media Kit contains the following:
- Shrink Plastic Sampler Pack: 2 each of clear, translucent, white and black
- Skull 6"x6" stencil from Crafter's Workshop
- StazOn Midi Ink Pad - Black
- Halloween Stripe Washi Tape from Queen & Co
- Fall/Halloween Clear Stamp Set
- Water Soluble Oil Pastels
- Paper Bag (style will vary)
- Halloween Confetti
- Skull Beads
- Hand Dyed Tags
- 6"x6" Paper from My Mind's Eye
- 6 colored A2 size cards (2 green, 2 orange, 2 black)
- 1 yard of ribbon
- Assorted Die Cut Frames
- Clip Art Sheet


I use the palette knife from this tool set.


Saturday, October 11, 2014

Autumn in the Park


 It seems only yesterday that my baby girl was playing in the park amongst the falling leaves. 

 A close up look at the locket embellishment.  This is my daughter at her senior prom.  Time flies!
Thank you for stopping by to see what the papers are saying today!  Have a fun fall weekend!


Stuck?! Now this is a layout!  Yeah!


The Color Room All of these colors are included in this layout.

 Picture
My Creative Sketches  I turned the sketch upside down.

Friday, October 10, 2014

Friday, October 10, 2014


                                         Dare to Dream!


 The clouds are drifting in from the west and soon the storm will be upon us!  But I am warm and dry curled up on my sofa with visions of dancing butterflies.  I simply adore the light airiness of these Webster papers which inspired me to great heights of whimsy for this layout.  I hope you agree.

 Here are a few close ups.


May all your dreams take flight!

Papers

Webster pages;  My Heart Flutters, Le Petite Cafe, Take Flight, Romantique

Embellishments

Creative Embellishments Chipboard flourishes
6x6 Stencil Decore II
Zva pink  flourish bling
My stash; lace, flowers and paints

Once Upon A Sketch   The journaling is on the back.  "These cutouts are of you on our trip to London this summer.  You were jumping between gates 9 and 10 at Knights Bridge train station where they filmed "Harry Potter"."


Scrap Around the World  Mood board.  I love the quote by the author  Nietzsche and felt it reflected my daughter's spirit.  I also used the butterflies, bling and colors.


ENTRIES CLOSE FRIDAY 31ST OCTOBER 23.55 EST

Tuesday, October 7, 2014

Totally Wicked canvas (Creative Embellishements DT)

Totally Wicked canvas (Creative Embellishments DT)

I am so excited and happy to be a new design team member for Creative Embellishments.  I simply adore their products.  My daughter loves Halloween.  I found these awesome spider web chipboard pieces in the store and and just had to put together  this reverse canvas vignette.  So I thought I would use these old Graphic 45 papers I found in my stash to create a sort of window from inside a haunted house looking outside to a spooky country side.
For the main spider web I first inked them with Tim Holtz  black soot  and Ingvlid Bolme Old Road then applied Tim Holtz black soot embossing power and Lindy Stamp Gang Golden Pumpkin Blush embossing powder.  The corner webs do not have the Pumpkin Blush embossing powder. 
 Peeking out before the gate is a line of grass that was inked with Ingvlid Bolume Moss Lawn and Golden Pumpkin Blush embossing powder applied. 
 Look how the Golden Pumpkin Blush embossing powder gives the filigree interest.

 I used floral moss for the floor of my vignette. 

 Here are the Creative Embellishment boarders I used on this canvas.

 Spider Web Flourish BordersWeb BordersGrass Border

Thank you for stopping by to see what the papers are saying today.  I hope you have a frightfully spooky Halloween. 


 Gauche Alchemy  Mood board

I have always enjoyed the old time movies.  Loved watching this video and the music was amazing.  Totally my style. 

mixed media challenge October moon

Stuck?!  sketch challenge  The window curtain and love webs make the corner triangles.